5")
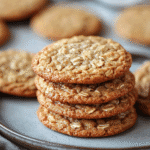
Healthy peanut butter cups are the perfect dessert for anyone who wants something sweet, chocolatey, and indulgent—without the sugar spike. These naturally sweetened treats are made with clean, pantry-friendly ingredients and take just 30 minutes from start to finish. Whether you’re trying to cut back on sugar, support a diabetic-friendly diet, or just make smarter snack choices, these healthy peanut butter cups deliver all the comfort of the classic candy with none of the guilt.
I first created this recipe after my dad was diagnosed with type 2 diabetes. Peanut butter cups were always our favorite, but store-bought versions were out. So I went back to the kitchen—determined to reimagine that nostalgic bite using real ingredients like coconut oil, peanut butter, and stevia. After a few messy attempts and a lot of freezer testing, we landed on something even better.
Now these healthy peanut butter cups are a staple in our home freezer—grab-and-go sweets that feel just as comforting as the ones I grew up with. They’re easy, versatile, and proof that healthy baking doesn’t mean giving up joy.
Table of Contents
Why These Healthy Peanut Butter Cups Work
Naturally sweet, no sugar needed
Most peanut butter cups are full of added sugar, palm oil, and artificial flavors. These aren’t. This version uses stevia, a plant-derived sweetener that keeps blood sugar stable, and melted coconut oil, which gives both the peanut butter and chocolate layers that irresistible creaminess and firm bite when chilled.
The peanut butter layer is where the magic starts. It’s smooth, slightly salty, and naturally rich, thanks to just a touch of vanilla and your preferred level of sweetness. I’ve made these with both vanilla extract and vanilla powder—either works beautifully.
If you’re looking for more no-sugar treats that taste indulgent, I highly recommend my sugar-free banana pudding or this cozy sugar-free cookie dough.
Freezer-friendly, quick, and easy
One of the best things about these healthy peanut butter cups? They come together fast—just stir, pour, and freeze. No baking, no fuss. I like using silicone muffin molds because they pop right out when ready, with perfect layers every time.
They’re ideal for prepping ahead: just stash a batch in the freezer, and they’re ready whenever the craving hits. I’ve even served these at gatherings, and no one misses the sugar.
For a full dessert spread, pair them with easy favorites like healthy pop tarts or my comforting sugar-free apple pie—both simple, satisfying, and guilt-free.
Smart Treating: Why Healthy Peanut Butter Cups Are Better Homemade
Control over ingredients = better nutrition
When you make healthy peanut butter cups at home, you know exactly what’s going in. No hidden sugars. No artificial preservatives. Just real ingredients like coconut oil, peanut butter, stevia, and carob or cocoa powder. That kind of clarity is hard to find in store-bought sweets—even those labeled “natural” or “low sugar.”
Plus, you can adjust them to your needs. Want more richness? Use cocoa powder. Prefer a lighter taste? Go with carob. Making these at home lets you adapt each batch to your flavor preferences and dietary goals.
I started doing this out of necessity, but I kept doing it because the results were so much more rewarding. Not only are they better for managing blood sugar, but they leave you feeling satisfied—not sluggish. If you’re building a healthier dessert habit, recipes like my sugar-free chocolate pudding or these healthy cheesecake cups are great companions to this one.
Support for low-sugar living without sacrifice
The hardest part about switching to a low-sugar lifestyle isn’t the meals—it’s the sweets. Desserts often come with the emotional weight of family memories, holidays, or just the daily comfort of a treat after dinner. That’s why recipes like these peanut butter cups matter so much. They let you enjoy those moments without giving up your health goals.
Every cup feels like a treat, but without the blood sugar spike or energy dip that usually follows. That’s what makes them ideal for diabetic-friendly meal plans, or for anyone who’s just trying to cut back on sugar without feeling deprived.
Homemade peanut butter cups don’t just taste better—they support your wellbeing. And the best part? No one has to know they’re healthy.
 6")
How to Make the Perfect Healthy Peanut Butter Cup
Keep ingredients warm, smooth, and simple
The secret to flawless healthy peanut butter cups? Temperature and texture. Start with room-temperature ingredients to avoid clumping—especially with coconut oil. Cold peanut butter or extract will cause the oil to seize up, leading to grainy layers. Use a spoon or whisk to mix the peanut butter layer until it’s smooth and pourable.
In a small bowl, stir together melted coconut oil, peanut butter, vanilla, and stevia to taste. Divide the mixture evenly into silicone muffin cups. Place them in the freezer and let them firm up—about 15–20 minutes is perfect.
While that first layer chills, prepare your chocolate topping. Mix carob or cocoa powder, melted coconut oil, vanilla, and stevia until silky. Pour gently over the solid peanut butter base. Freeze again until firm. That’s it.
 7")
The result is a clean two-layer treat with bold peanut butter flavor and a soft chocolate shell that melts perfectly in your mouth. For more grab-and-go ideas, try these protein muffins or my banana oat chocolate chip cookies—both simple, wholesome, and naturally sweet.
Silicone molds make a big difference
Don’t skip the silicone. Traditional muffin tins can cause sticking, which ruins the perfect edges and layered look of your peanut butter cups. Silicone liners pop the treats out effortlessly and give them that classic shape we all love.
You can find these molds in most baking aisles or online—and once you have them, you’ll use them constantly. I keep a dedicated set just for freezer desserts like these, and they’ve been a game-changer for quick, healthy snacks on repeat.
Better Peanut Butter Choices for Healthier Sweets
What makes peanut butter “healthy”?
Not all peanut butters are created equal. If you want the cleanest, most nourishing version of healthy peanut butter cups, the peanut butter itself has to measure up. Look for brands with one or two ingredients only: peanuts and maybe salt. That’s it.
Skip anything with added sugars, hydrogenated oils, or syrups. Creamy natural peanut butter is ideal for this recipe—it blends easily with coconut oil and sets beautifully in the freezer.
Bonus tip: Stir your peanut butter thoroughly when you open a new jar. Natural separation is normal, but a consistent texture ensures even mixing for your base layer. I use the same no-stir trick in my high protein pancake recipe, where peanut butter adds depth without processed ingredients.
Flavor pairings and storage tips
Healthy peanut butter cups can be more than just a sweet snack. Pair them with a piece of fruit for a satisfying mid-afternoon treat, or enjoy one alongside a cup of herbal tea for a cozy, blood-sugar-friendly dessert.
Want more flavor depth? A sprinkle of sea salt on top of the chocolate layer before freezing adds a gourmet touch. Or swirl in a bit of cinnamon or espresso powder to either layer for a unique twist.
Store your finished cups in the freezer for up to a month in an airtight container. Let them sit at room temperature for a minute before biting in—that way, the chocolate layer won’t be too firm.
I use the same method with my sugar-free donuts when prepping ahead—they hold up well in the freezer, just like these cups.
Print 8")
Healthy Peanut Butter Cups (No Sugar!)
These no sugar healthy peanut butter cups are made with real ingredients like coconut oil, stevia, and peanut butter. A perfect freezer treat!
- Total Time: 30 minutes
- Yield: 4 cups 1x
Ingredients
PEANUT BUTTER LAYER:
- 2 Tablespoons melted coconut oil
- 4 Tablespoons peanut butter
- ¼ teaspoon vanilla powder (or 1/2 tsp vanilla extract)
- Stevia to taste
CHOCOLATE LAYER:
- 3 Tablespoons carob or cocoa powder
- 3 Tablespoons melted coconut oil
- ¼ teaspoon vanilla powder (or 1/2 tsp vanilla extract)
- Stevia to taste
Instructions
- Step 1: Stir the peanut butter layer ingredients together until smooth and well combined.
- Step 2: Divide the mixture evenly into 4 silicone muffin cups.
- Step 3: Freeze the peanut butter layer until firm to the touch, about 15–20 minutes.
- Step 4: In a separate bowl, mix together chocolate layer ingredients until smooth.
- Step 5: Pour chocolate mixture over frozen peanut butter base, dividing evenly.
- Step 6: Return to the freezer and chill until completely solid.
Notes
- Use room temperature ingredients to prevent clumping.
- Store in the freezer up to 1 month in an airtight container.
- Let thaw 1–2 minutes before serving for best texture.
- Prep Time: 10 minutes
- Cook Time: 0 minutes
- Category: Dessert
- Method: No-Bake
- Cuisine: American
- Diet: Diabetic
Nutrition
- Serving Size: 1 cup
- Calories: 160
- Sugar: 0g
- Sodium: 45mg
- Fat: 15g
- Saturated Fat: 9g
- Unsaturated Fat: 6g
- Trans Fat: 0g
- Carbohydrates: 5g
- Fiber: 2g
- Protein: 3g
- Cholesterol: 0mg
Frequently Asked Questions About Healthy Peanut Butter Cups
Are peanut butter cups healthy?
Regular peanut butter cups typically contain processed oils, high fructose corn syrup, and artificial ingredients. In comparison, healthy peanut butter cups are made with whole, simple components like natural peanut butter, coconut oil, and stevia. When you make them at home, you control every ingredient—so they’re not just a sweet treat, they’re a smarter one, too.
What is the healthiest thing to put peanut butter on?
If you’re trying to eat clean, peanut butter pairs beautifully with apple slices, celery, low-carb toast, or oats. But the best use might just be turning it into healthy peanut butter cups—a snack that feels indulgent and still supports a low-sugar lifestyle.
What is the most healthy peanut butter to eat?
Look for peanut butter with just one ingredient: peanuts (or two, if it includes salt). Avoid added sugars, hydrogenated oils, or preservatives. Natural or organic peanut butter, especially varieties stored in glass jars, tend to be less processed and more nutrient-dense.
Are Skinny Dipped peanut butter cups healthy?
Skinny Dipped cups use better ingredients than traditional candy, but many still contain added sugars and natural flavors. If you’re watching your sugar or carb intake, making your own healthy peanut butter cups at home is the best way to control every ingredient and keep it fully no-sugar.
These healthy peanut butter cups are the kind of dessert that makes you feel good about what you’re eating—and how you’re caring for yourself. They deliver everything we love about the original: a rich peanut butter center, smooth chocolate top, and just the right sweetness. But unlike store-bought versions, these cups are made from simple, wholesome ingredients with no added sugar.
That’s the beauty of making your own healthy peanut butter cups. You get total control over every ingredient, from the type of peanut butter to the sweetener, and you can keep a batch ready in the freezer for whenever the craving strikes. They’re not just diabetic-friendly—they’re family-friendly, snack-time approved, and even holiday-worthy.
If you try these healthy peanut butter cups, I’d love to see your spin! Share a photo on Instagram, tag @letsmakerecipes, or save the recipe to your Pinterest board to come back to later. You’ll find even more low-sugar, naturally sweet recipes to pair with them, from muffins to puddings and beyond. You can also join me on Facebook for weekly tips and new recipe drops.
In the end, these healthy peanut butter cups are more than a treat—they’re a reminder that feeling good and eating well can go hand in hand.
")